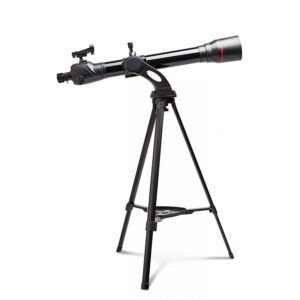
Many telescopes, especially small telescopes, come supplied with an Equatorial Mount often described as a German Equatorial Mount.
For beginners this type of mount may seem complicated. However, if approached in the right way the setup is fairly straightforward and will make observing much easier.
In this post, we will take you through the process of setting up your equatorial mount step by step, as part of our broader series on How to Use a Telescope.

How to Setup and Align an Equatorial Mount
First, take your telescope off the mount. Some adjustments need to be done to the equatorial mount, and this will make it easier. Now do a quick internet search of where you live, or a large city or town within 100 miles or so, and find your approximate latitude.
Find the latitude scale on your mount, which looks like a dial with numbers, and then, after unlocking the clutch, set the pointer on the latitude scale to the latitude at or near the latitude of where you live, relock the latitude adjustment.
It doesn’t have to be perfect for right now, within a few degrees is fine.
Levelling the Tripod and Mount
Next is levelling the tripod and mount. Most telescopes these days have level bubbles, make sure the bubble is in the centre of the circle. The next step is often misunderstood, but it’s very important, and that is balancing your scope. There are two axes to an equatorial mount.
But let’s start with the Right Ascension Axis. Very often, there are setting circles on the Right Ascension Axis, and it’s likely the larger of the setting circles is Right Ascension. This is the axis that has the telescope on one side and a counterweight on the other.

Begin by setting up your telescope, similar to how you’d be using it at night. So, start by placing your telescope back onto the mount and put a low power eyepiece in the focuser.
These will often have a 20mm, 25mm or 26mm, printed on them somewhere.
Now, unlock the right ascension clutch and rotate them out so that your telescope is off to one side. Hold the telescope with one hand and leave the clutch unlocked, then release the set screw on the counterweight.
You can then slide the counterweight back and forth on the counterweight shaft until you can feel that the telescope is balanced.
Balancing the Telescope
Next, unlock this clutch and turn the telescope. Most equatorial mounts will have the telescope held in rings or cradle.
Loosen the cradle locks, just enough that the two can slide back and forth. This axis is a bit harder to get balanced well, especially with lighter tubes. But if you can set the scope slightly sideways, you will be able to push it back and forth until it feels balanced.
When you’re satisfied that the telescope tube is well balanced in this access point, so that it is straight up over the equatorial mount, then relock the clutch. Now, your scope is in the starting position.
This is a bit fiddly, but you only need to do it once.

Counteracting the Earth’s Rotation
Now we need to set up our Equatorial mount to counteract the spinning of the earth on its axis so that objects don’t drift out of the field of view in the eyepiece. By aligning our latitude adjusted level counterbalanced telescope at the celestial pole. The celestial pole is simply an imaginary spot in the sky of round which all the other objects in the sky appear to rotate.
We must align our Equatorial mounts towards the ‘North Star’ that star, which is Polaris. To align your telescope at Polaris first begin with your telescope in the starting position on the equatorial mount, as described earlier.
Next, make sure that the two are aligned with the right ascension axis and the declination axis, so that everything is parallel and square.
A Little Help from Stellarium
Next login to the internet and search for a website http://stellarium.org this is an excellent software which is free to use, you enter your location and a time, and it will show you what is available to look at in the night sky!
Next find Polaris so you know where to look when you go out at night. This next part needs to be done at night when you are ready to start observing. Looking through your finder-scope and using the fine Equatorial mount adjustment and Azimuth adjustment until Polaris is centred in your finder-scope crosshairs (or red dot).
Now look through the low power eyepiece, and if your finder scope is aligned properly, it should at least be visible through the main telescope. Continue making minor adjustments until Polaris is centred in this eyepiece.
Okay, so now you found Polaris and aligned your scope.
Lock the Azimuth and latitude locks and you are ready to go!

How to Use a Telescope | Part 3 | Equatorial Mount
Now you are all set to move to next article in the UK Telescopes guide on how to use a telescope!
If you are still uncertain as to whether you should choose a telescope or spotting scope, please don’t hesitate to contact on of our experts via our handy Chat Tool in the bottom right corner of the page.