Photograph the Moon
Smartphone cameras have advanced in recent years, they produce excellent quality terrestrial photographs and used in the right way can also take photos of the night sky, Astro Photography. In this short tutorial I cover the basics to take some good quality photos of the Moon.
Picture of the Moon
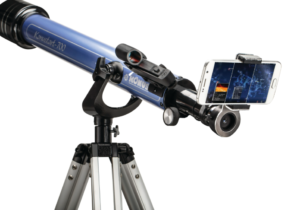
I’m going to show you how to take a sharp picture of the moon with any telescope and your smartphone, this photo was taken with my iPhone 6s which is a five year old smartphone and a Konustart 900 telescope which is not very expensive you can find it on uk-telescopes.co.uk for under £200 With a motorised mount this is a Refractor design, it has 900mm focal length, to give you some perspective your smartphone camera has something like 25mm or 30mm maybe on the latest iPhone 12+ it is up to 58mm focal length, so the telescope gives you a lot more power in terms of magnification which is great for photographing the Moon.
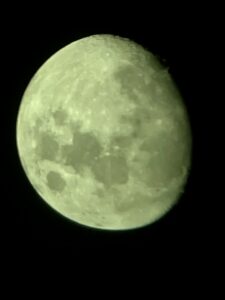
You might be wondering well couldn’t I just point my phone up to the moon and then just pinch in until I get a nice picture? The answer is no, the way that the optics work you’re never going to be able to achieve that level of detail with just a digital zoom, you are always going to need something with more focal length to get a nice sharp detailed picture.
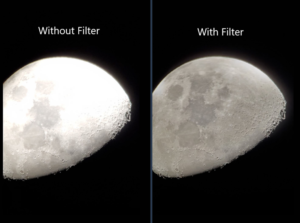
Something you may have noticed about this photograph is that the moon is not full, why didn’t I wait until the moon was completely full to take the picture and see more of the moon? The problem is that when the moon is completely full it means that the earth is right in between the Sun and the moon and the Sun shines directly onto the moon’s face, and so if you light something straight on like that you don’t get any depth because the lighting is just coming straight back at you. If the light comes from the side, it gives more depth and a 3D feeling, this way you get a lot more definition in all the little craters and sharpness to the features.
yepiece.
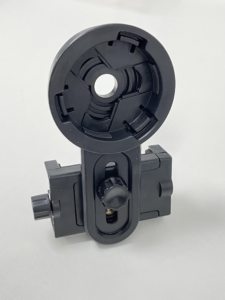
Smartphone Adapter
For this reason I like taking pictures of the moon when it’s in phase, one of the best times is around the third quarter moon or last quarter moon but I also like taking pictures of it when it’s in the gibbous phase, when it’s a little bit more full but not completely full you then get this nice effect where you can really see the high definition craters along the edge.
So how do we take a picture of the moon with our phone and our telescope? If you’ve been to a star party or a stargazing event you’ll see a lot of people just trying to hold up their phones to the eyepiece and it’s very difficult to get a good picture that way, there’s two reasons the this, first it’s actually really hard just to align the lens with the eyepiece so that it’s in the right path. The second is it is tricky to hold the phone steady so the image doesn’t have a blur.
The best way is to use a universal smartphone adapter device like the one in the photo, they do a really good job, usually made out of plastic so they’re not expensive, you can buy them from UK TELESCOPES for around £10. Once you have attached the device to your telescope eyepiece you then carefully align the phone lens with the eyepiece until you have a clear round view on the screen of your phone. Next, lock it into this position. You are now ready to take a picture! That’s it, a really simple way to do Astro Photography and you can achieve really nice results great for sharing on social media or sending to friends and family.
Find The Moon
Once the phone is setup the next challenge of course is to find the Moon, this is the same no matter what kind of telescope you have you will have to use the little finder scope that comes with your telescope. Look through it and move the telescope back and forth until the Moon is nice and centered in the Finder Scope, after you do that you might not be exactly aligned and you may have to make smaller adjustments to get the moon in the eyepiece. Once it’s in the eyepiece you can focus the image and you are ready to take photos and videos. Smartphone photos like these don’t usually need much editing, you can go ahead and share this with whoever you want or print it out.
If you did want to do some editing there is an app that I recommend, it is called Snapseed it’s available on both Android and iPhone and what I would maybe do in Snapseed is just change the contrast and the saturation and maybe crop.
In a future tutorial I will cover how to do prime focus photography of the moon with a DSLR. For prime focus photography we don’t use the eyepiece, what we do instead is we get a prime focus adapter and connect it to the telescope directly and the camera becomes the eyepiece. No need to use additional optics as the telescope focuses the image directly onto the cameras sensor and you can get higher resolution and a little bit more control by shooting raw photos or video.
This can achieve high resolution images that are going to be sharper, these are more advanced techniques but if you get interested in lunar photography from this article, I hope you will join me on the next one.
I wish you all clear skies over the next few months!
How to Use a Telescope | Part 1
Now you are all set to move on to Part 2 of the UK Telescopes guide on how to use a telescope!
When you take your Telescope outside on a clear night. you will find the object you want to look at through the Finder Scope first. Once this is centred, you can then look through the Telescope Eyepiece and there will be the magnified object.
If you are still uncertain as to whether you should choose a telescope or spotting scope, please don’t hesitate to contact on of our experts via our handy Chat Tool in the bottom right corner of the page.
